Introduction
For new blockchain users, bridging crypto from one chain to another can be intimidating. But it doesn't have to be.
In this guide, we’ll show you exactly how to complete your first bridge transfer, from start to finish, in under five minutes using Across.
We won’t go into how bridges work or compare different tools. Instead, we’ll walk you through one clear goal: sending ETH from one chain to another quickly and safely.
Whether you’ve never bridged before or you’ve tried and got stuck, this guide is for you.
What You’ll Need Before Starting
In this guide, we’ll focus on a single task: bridging ETH from the Ethereum mainnet to the Base Layer 2 blockchain using Across. Most users begin on Ethereum as their entry point, making this task common for beginners.
Before you begin, make sure you have the following:
Crypto Wallet: Use a self-custodial wallet such as MetaMask, Phantom, or Coinbase Wallet. This guide uses MetaMask on a desktop browser to keep things simple.
ETH for Gas Fees: In addition to the ETH you want to bridge, you’ll need a little extra ETH in your wallet to pay for fees. If you bought ETH using MetaMask or an app like Coinbase, make sure it’s already in your wallet before you start. If your ETH is still on an exchange, send it to your wallet first.
Supported Browser: We recommend using Chrome, Brave, or Firefox on desktop. While Across also works on mobile, this guide is written for desktop users, so the steps are easier to follow.
Step-by-Step: Your First Bridge Transfer
Now that you have your checklist completed, follow the steps below to bridge ETH from Ethereum mainnet to Base using Across. This process typically takes less than five minutes.
1. Connect Your Wallet to Across
Visit app.across.to/bridge? and click “Connect Wallet” in the top-right corner.
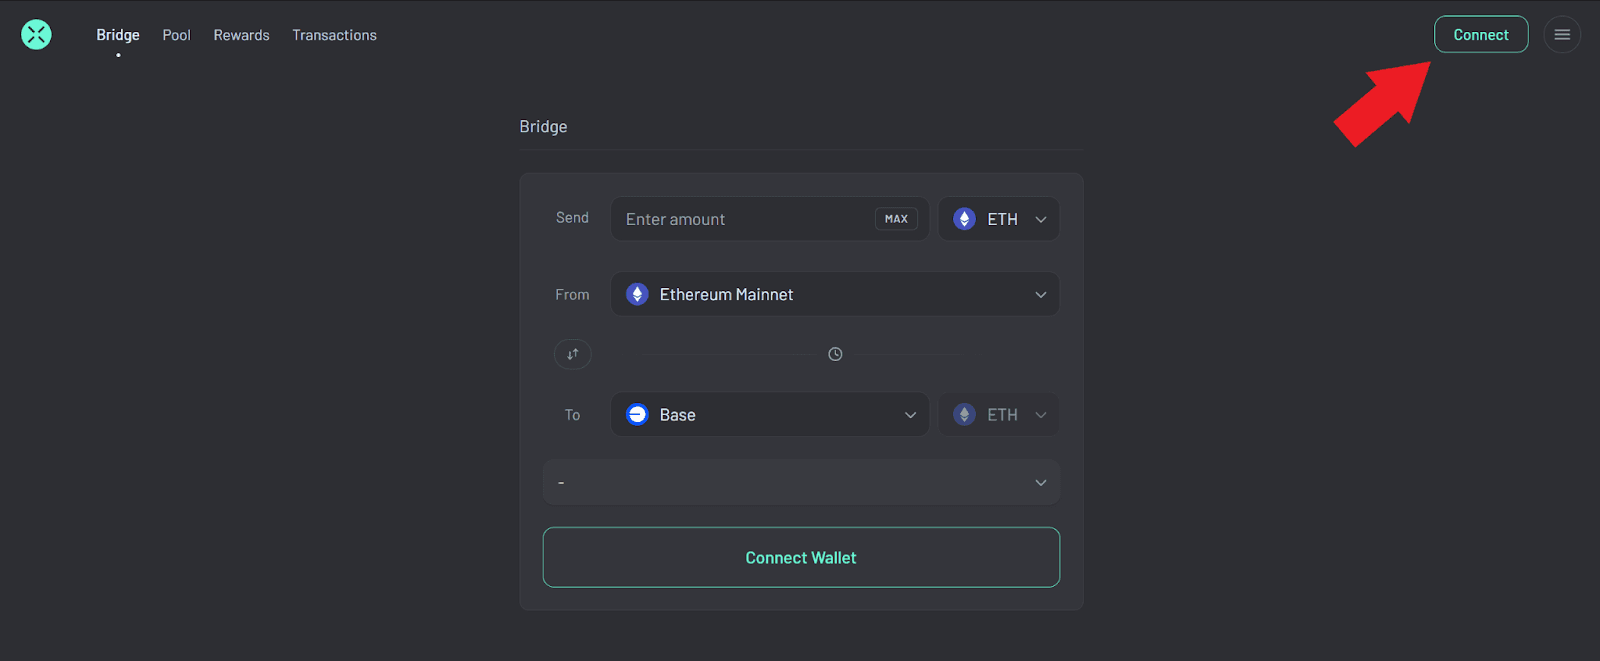
Connect your wallet to Across.
Choose your wallet. This guide assumes you’re using MetaMask, but you can also select Phantom, Coinbase Wallet, or use Wallet Connect to connect to other providers.
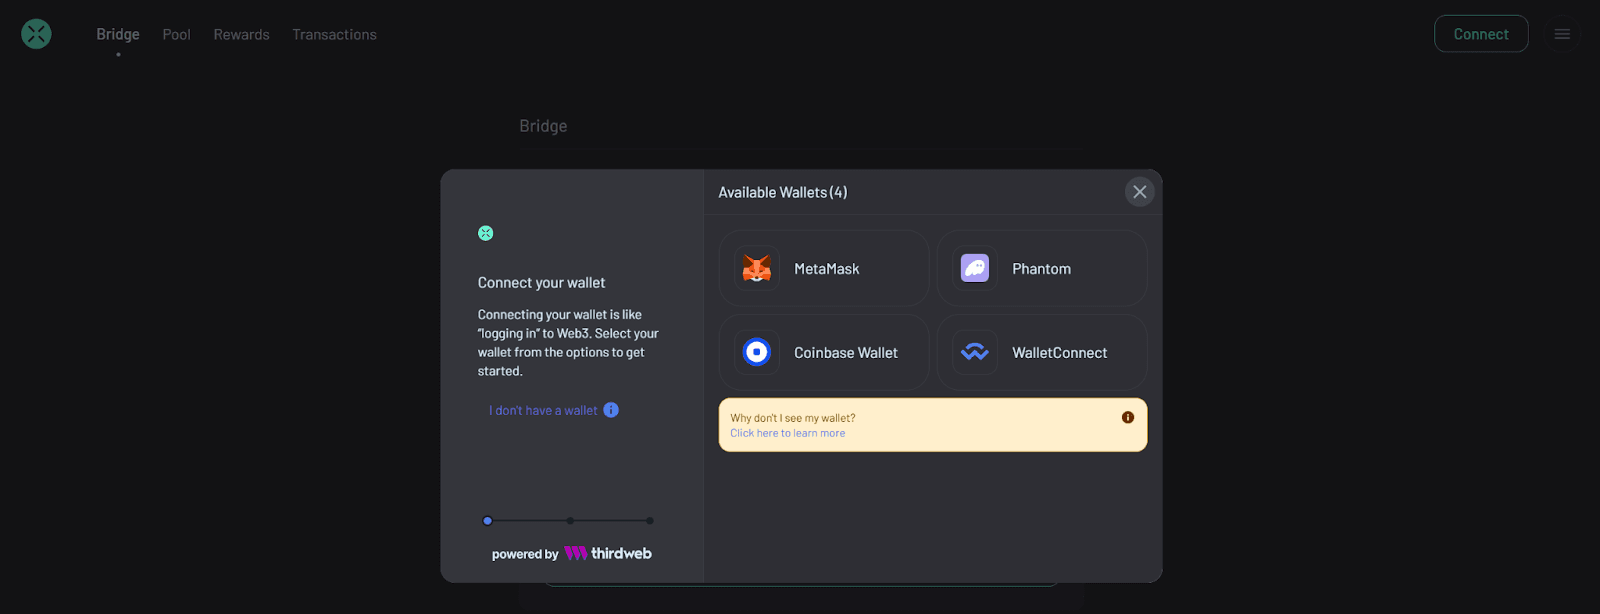
Choose your wallet provider.
Once you click connect, be sure to approve the connection request when prompted.
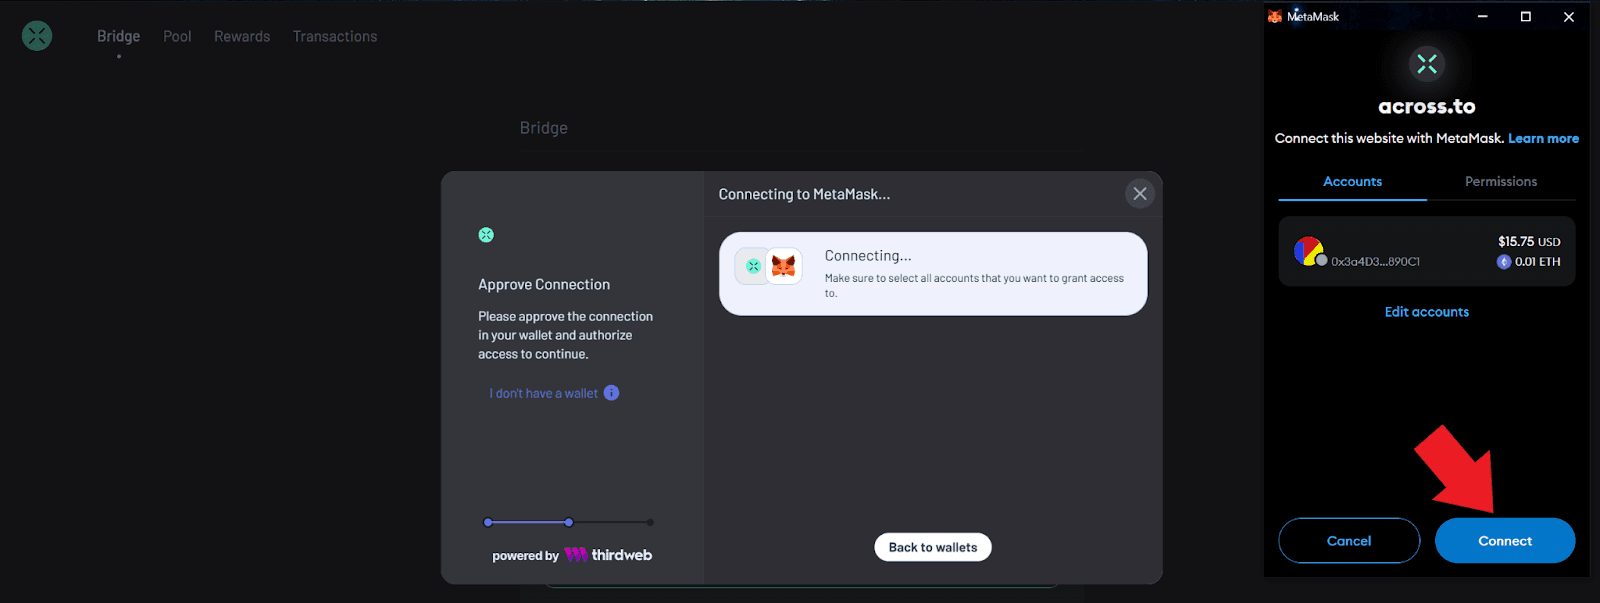
Connect your wallet.
If your wallet doesn’t connect:
Make sure your wallet extension is unlocked
Check that your browser supports wallet connections
Refresh the page and try again
2. Select Origin and Destination Chains
Next, use the dropdown menus to select your origin (from) and destination (to):
From: Ethereum Mainnet
To: Base
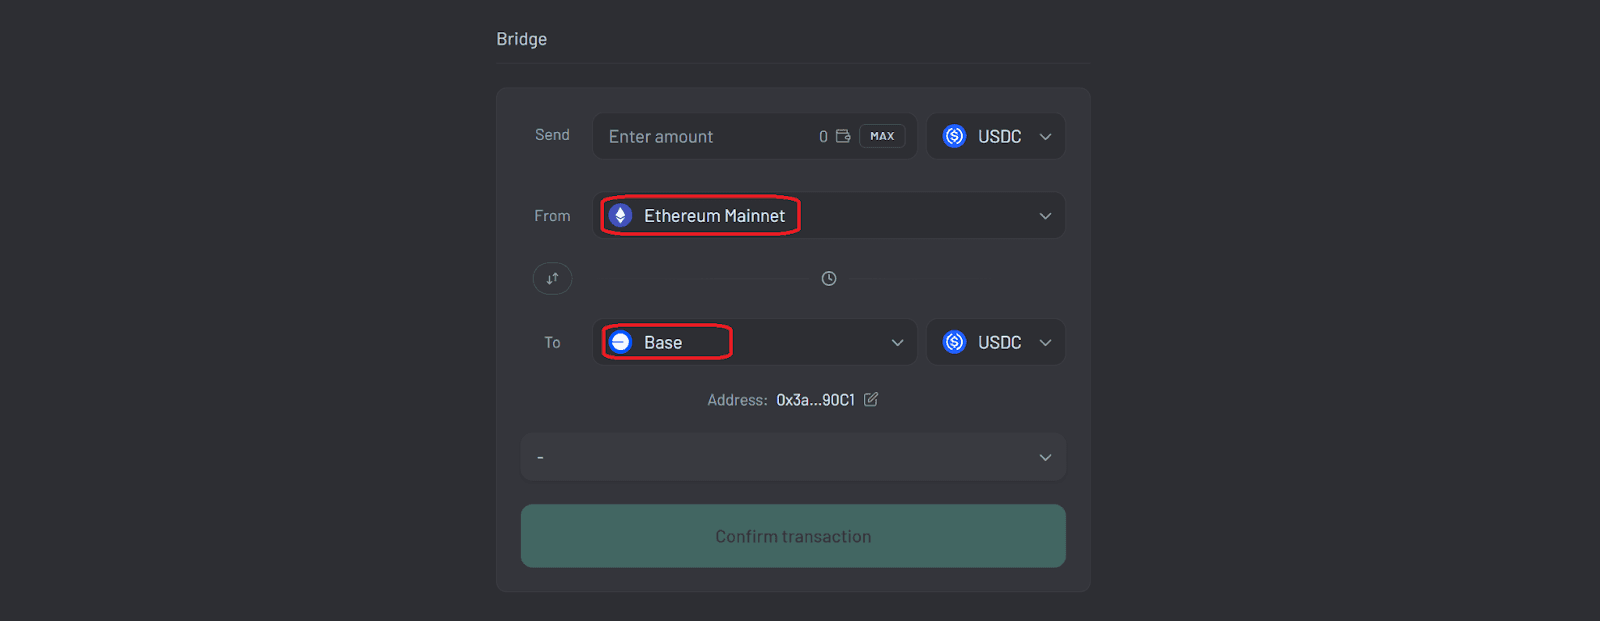
Select your origin and destination chains.
3. Enter the Transfer Amount
In the send box, enter the amount of ETH you want to bridge. The maximum amount you can transfer will be shown automatically.
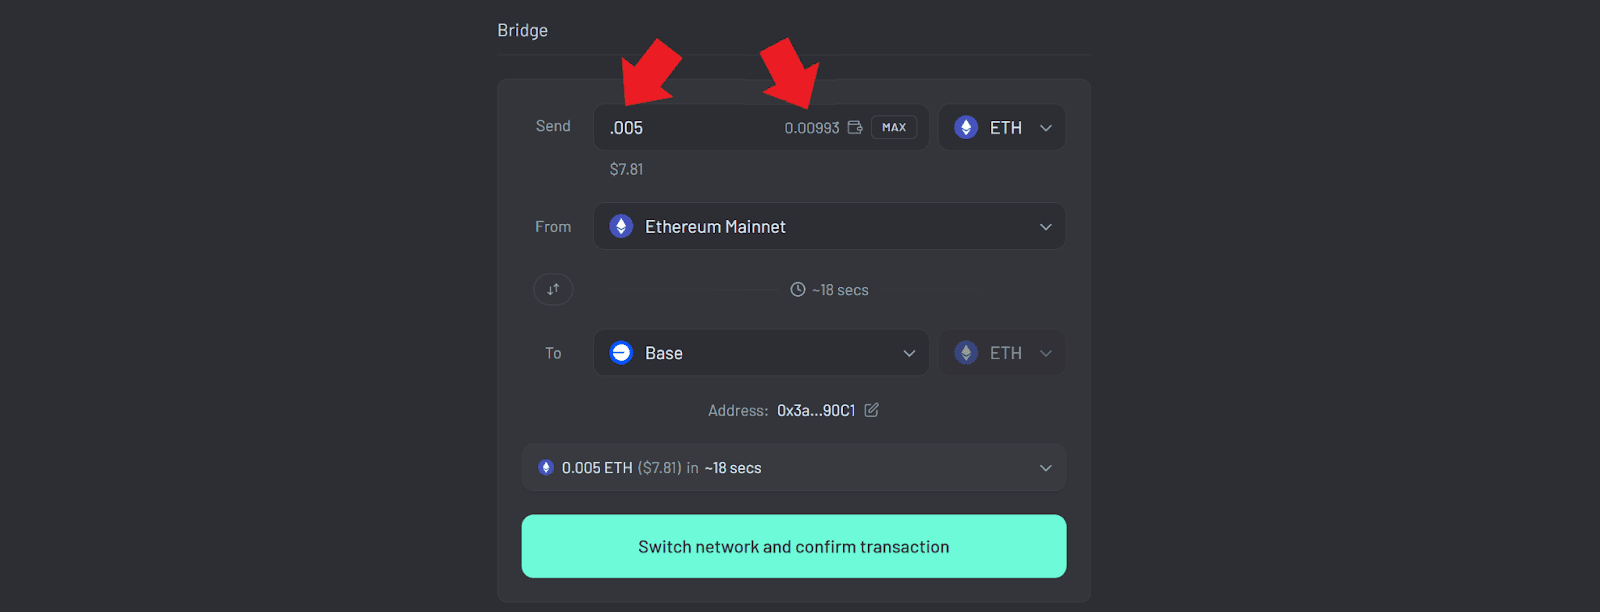
Enter the amount of your selected token that you want to bridge.
Across will show you the estimated fees and bridging time. Fees are typically around $0.04, and transfers complete in a few seconds.
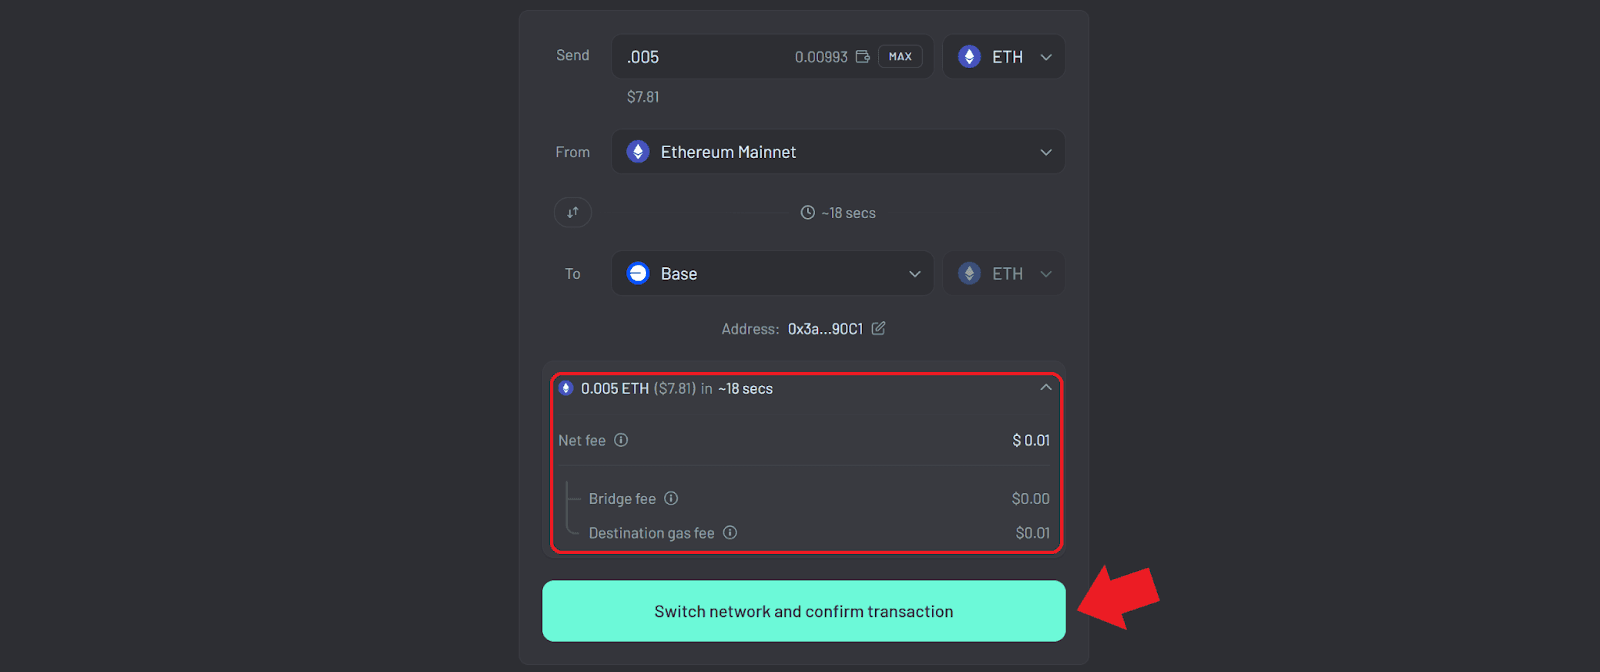
Review the estimated bridge time and fees.
Check that your wallet is connected to the right source chain (Ethereum Mainnet). You may be asked to switch networks before you can continue.
4. Approve and Confirm Your Transfer
Now you’re ready to start bridging. Click “Confirm transaction” (or “Switch network and confirm” if needed). Your wallet will open a pop-up with the details.
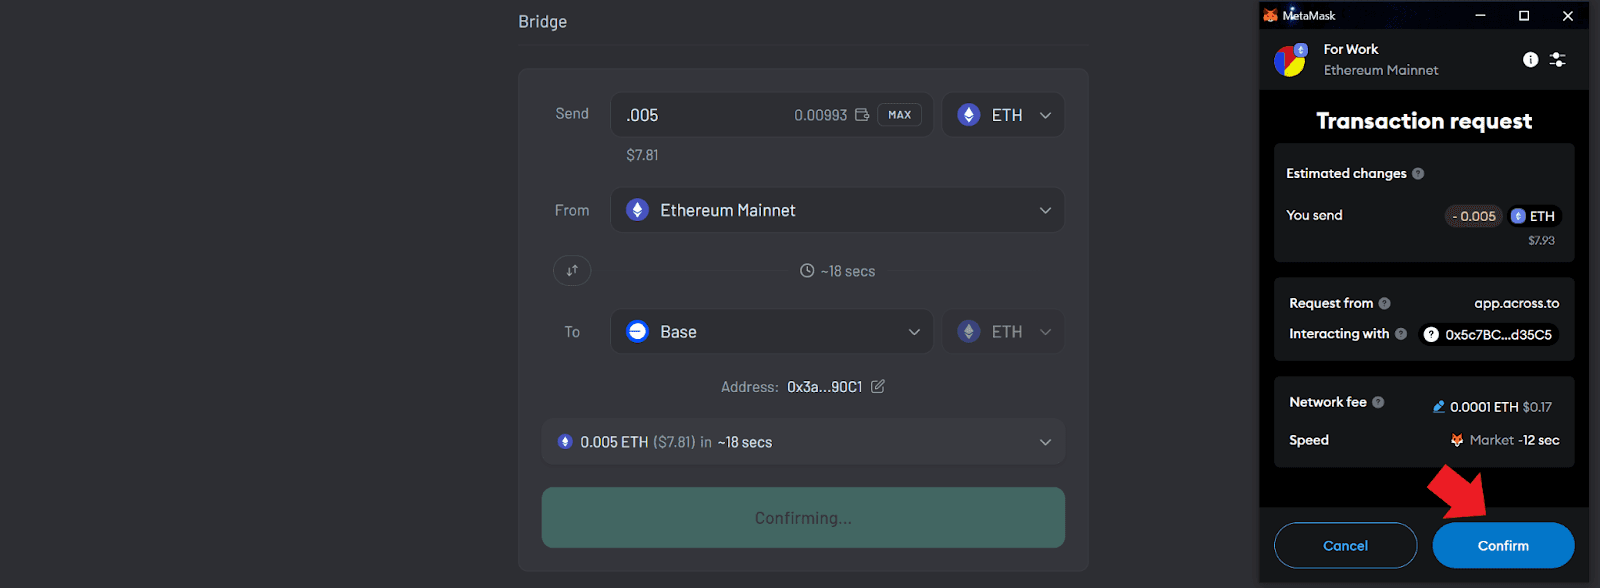
Approve and confirm the bridge transaction.
Check that everything looks right, then click “Confirm.” This sends your transaction to the network.
5. Track Your Transfer
Once confirmed, you’ll see the Across status tracker. Most transfers complete in 2–3 seconds, but Ethereum mainnet activity may cause slight delays.
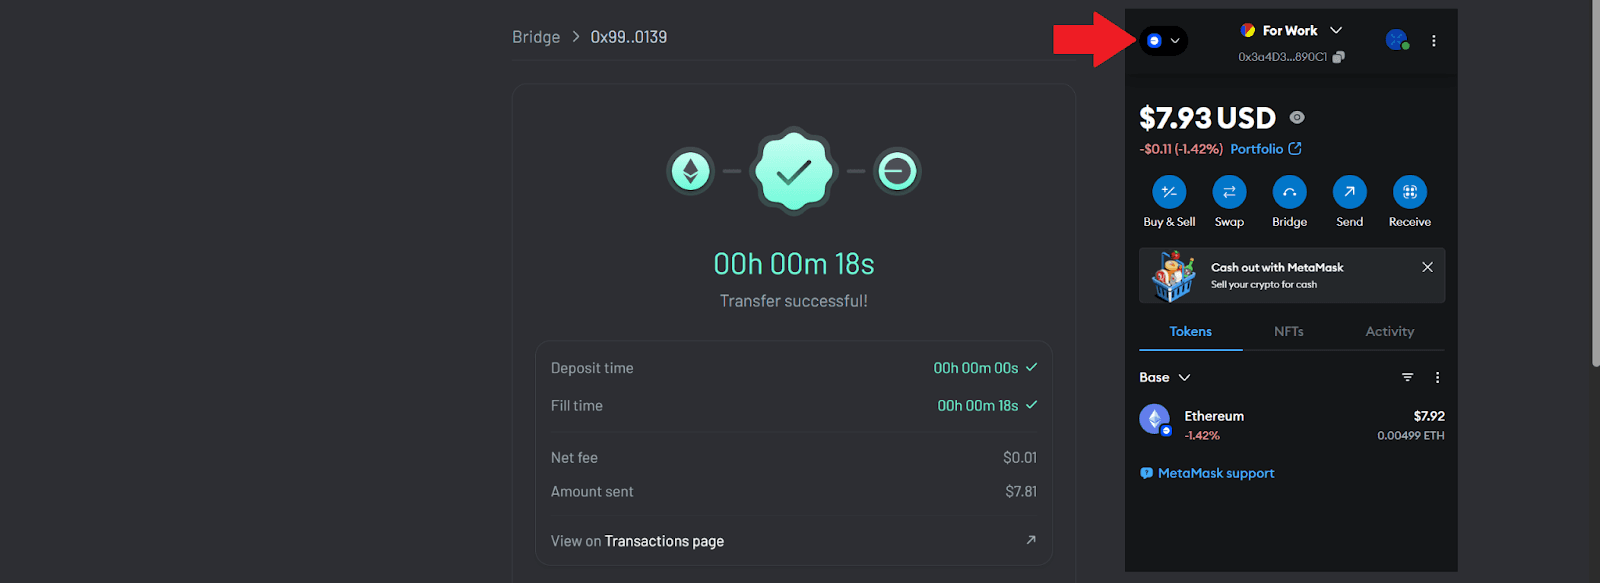
Track your transfer.
Once the transfer is complete, your ETH should appear in your MetaMask wallet. Use the network selector dropdown menu to switch to the Base network to check your balance (see the screenshot above).
Troubleshooting Common First-Time Issues
Most transfers on Across finish in just a few seconds. But if something seems off, here are quick ways to fix common issues.
“My transfer is taking longer than expected.”
If you're sending from Ethereum Mainnet rather than an L2, it might take a little longer than usual due to block confirmation times.
You can check the status on the Across transaction page or on Etherscan by entering your wallet address.
If the transfer is still showing as pending, wait a few minutes and try again.
“I don’t see my funds on the destination chain.”
Make sure your wallet is switched to the Base network.
Click “Add Base Network” in your wallet if you haven’t already.
Refresh your wallet or browser tab and check your balance again.
“I got an error message.”
Refresh the page and reconnect your wallet.
Make sure you’re still connected to the Ethereum Mainnet.
Double-check that you have enough ETH to pay for the transfer.
If you’re having trouble sending a small amount, try entering a bit more.
What Now? Here are a Few Next Steps
Congratulations! You’ve just completed your first bridge transfer. Now you’re ready to explore more of what Across can do.
Try a Small Test Transaction: If you haven’t already, try sending a small amount, such as 0.005 ETH from Ethereum, to Base. It’s a quick way to practice and build confidence.
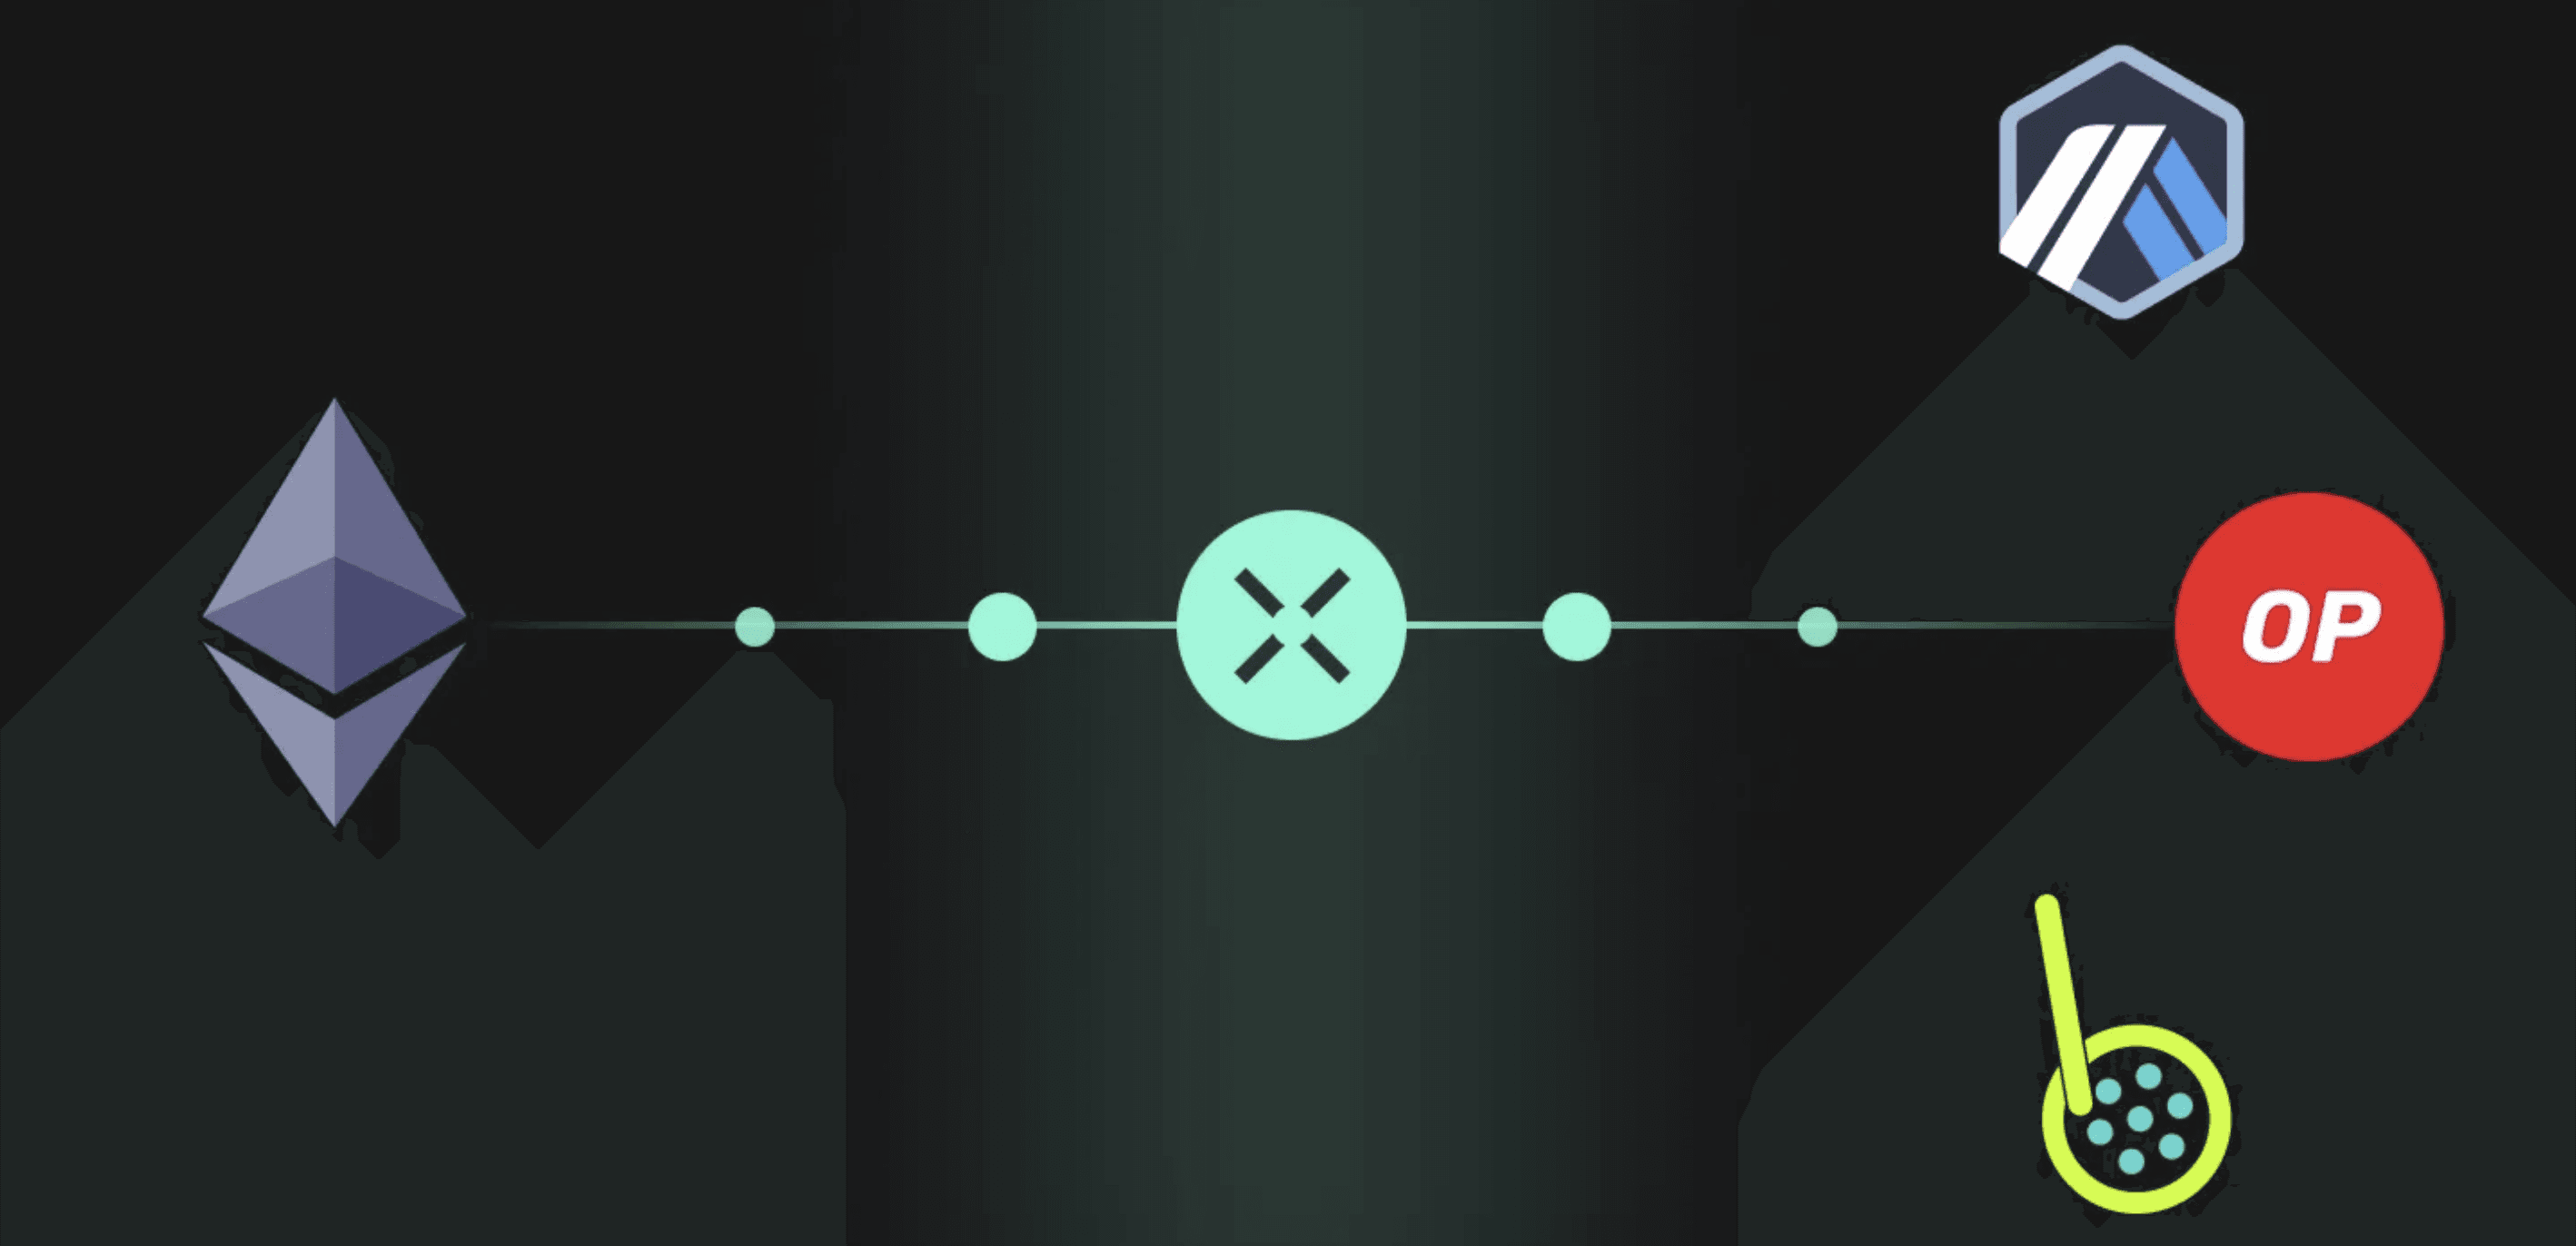
Bridge Between Different Chains: Across works with chains like Arbitrum, Optimism, Polygon, and ZKsync. Just pick a new "from" and "to" chain, and the steps stay the same.
With an average cost of just $0.04, Across facilitates median transfer times like:
L2 → L2: 3 seconds.
L2 → L1: 8 seconds.
L1 → L2: 18 seconds (like in this guide).
Bridge a Larger Amount: Once you feel comfortable, try sending more ETH. Across can handle bigger transfers quickly and with low fees.
Explore Other Assets: You can also use Across to bridge USDC, DAI, wETH, and other tokens. Available options depend on which chains you’re using.
Learn More: Want to dive deeper? Read our full Complete Guide to Crypto Bridges to learn more.

